Tuesday, August 30, 2011

Mrs. Cookie's Squash Casserole

    The summer before I went to college I was the nanny for our neighbor's three grandchildren. When I say "neighbor" please do not picture suburbia. We lived in the boonies and our one and only neighbor's house was about half a mile from ours. We would ride our four-wheeler on the shut-down railroad tracks back and forth between our houses. Are you modifying the picture in your head? Good. We lived in what I like to call the "co-n-tree."
     Back to our neighbor's grandchildren: they have three of the most precious, beautiful, and smart grandchildren on the planet. They all started reading by age four. They take violin, piano, voice, chinese, karate, and gymnastics just to name a few. When I was their nanny their ages were 3, 4, and 5. My job as their nanny was to prepare their meals; teach them reading, writing and simple math; entertain them during play time (OK, OK. I had fun, too); and make sure they stayed out of trouble. Their grandmother Mrs. Cookie, whom they called "ya-ya," was always around-- in the garden, feeding the horses, donkey, and the dogs, washing clothes, and cooking something delicious. I say I prepared the kids meals-- and that was true most of the time-- but a lot of the time Mrs. Cookie would make a casserole, muffins, or have left overs I could easily heat up for the kids. My favorite thing she made was squash casserole. I would fix the kids their plates and then walk over to the casserole dish, serve myself enough for two grown men, pour a glass of sweet tea and let the world fade away. Her squash casserole is comfort food in it's truest form: butter, cheese, mayonnaise, pecans and the perfect crunchy, salty topping of Ritz crackers. 
     This past Sunday I cooked up BBQ country ribs and the squash casserole I love oh so much. When we sat down at the table to eat Adam and I held hands, like we always do, and he blessed the food. He said, "Dear Lord, thank you for these country ribs and my country wife." I cracked up in the middle of the prayer. Adam likes to eat healthy just because he is a very health conscious person (and I am thankful for that, most of the time), but Lord knows my baby likes him some turnip greens with bacon, lima beans and Conecuh sausage, fried deer steak, fried catfish and hush puppies, and a butter biscuit. And I thank the Lord for that. "Thank you Lord for my health-nut husband, that likes my country cooking!"


     If you have someone in your life that likes good ol' down home cooking, do something special for them and cook up this squash casserole. Here is how I made it:


Begin by sauteing diced onions and green bell pepper in butter. 


Next cut up the squash, and toss it in the skillet with the onions and bell pepper.

Sprinkle in salt and pepper. I am one of those people that salt and pepper their food before they even taste it, because face it: salt and pepper makes things taste better. The more you use, the better things taste. Or at least that is mine and my dad's philosophy. Disclaimer: Probably not a good philosophy to live by considering a high sodium diet can increase your blood pressure. But, my dad and I are as healthy as two horses. Just take a look at the picture of me and him at the bottom of this blog-- we ran a half marathon together this past winter. I'd say we're doing just fine. So don't be afraid to tilt that salt box honey. You go on and tilt it, tilt it good.

Cook the squash for 10-15 minutes, or until it is fork tender.


In a separate bowl...
crack two eggs.


Next add in mayonnaise and pecans.


Then a little sugar.

Can I say one thing? (of course I can, it's my blog) We southern people are very particular about what we will and will not put sugar in. And it changes from family to family. In my family it is NOT OK to put sugar in cole slaw, corn bread, or turnip greens. People argue about whether sugar in cole slaw, cornbread, or turnip greens is truly southern or not-- but I'll say this: My daddy grew up in southern Alabama, had nine brothers and sisters, they had an outhouse, dirt floors, his daddy made moonshine, and they sold turpentine. I don't think it gets more southern than that and his momma, my Nanny Mary, would NEVER put sugar in her coleslaw, cornbread, or turnip greens. I call Bible on that one.

Back to the recipe:

Add a good handful of cheese to the bowl
and stir to combine.
Add in the tender squash, and mix well.


Pour the mixture into a greased 8X8 casserole dish.


Crush a roll of Ritz crackers and sprinkle them over the top.


And finally, melt some butter and drizzle over the crackers. Place the casserole in a preheated 350 degree oven for about 25 minutes.


Out will emerge this beauty!

Look at the perfect golden crust. I will just about eat anything that is mixed with mayonnaise and cheese topped with crackers and butter. Seriously. But this is not just anything. This is perfection.


This was a good Sunday lunch. And so easy!

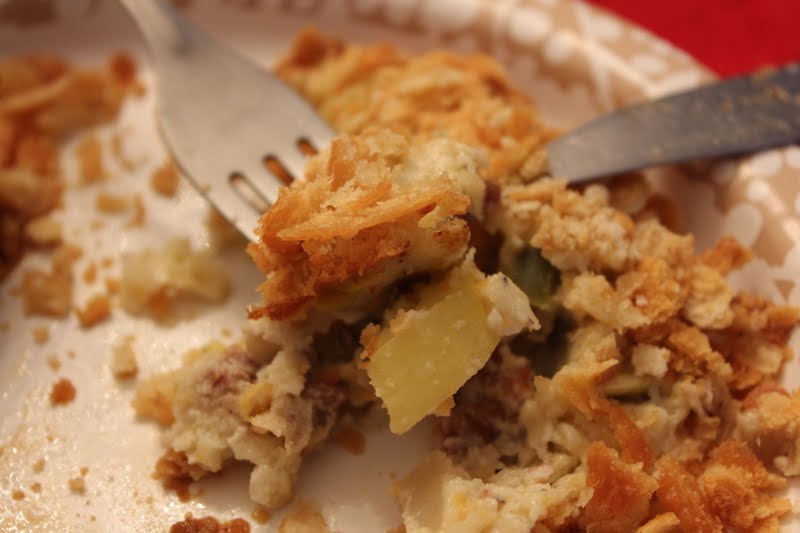
That went in my mouth. And it was good.

Mrs. Cookie was sweet enough to tell me what is in her squash casserole, and I want to pass it on to you!
For the full recipe with measurements check out my recipe on TastyKitchen.com by clicking here:
If you have tasted this recipe before or cook it up now be sure to rate it on TastyKitchen.com. That would mean a lot to me!


If you are not from the deep south you might not know how secretive the women are about their recipes. I know sisters that won't tell each other what ingredients they use for certain recipes. It's that serious. Although, not everyone is like that. And if you ask me, the ones that share are the greatest cooks anyway. I have some sweet women, that are amazing cooks, in my life that let me in their kitchen, wrote down their recipes for me, and showed me step-by-step how to do things. Thank you Nanny! Momma! Mrs. Ruth! Aunt Mable! Mrs. Cookie! Thanks for teaching me how to cook and for sharing your amazing recipes. I love y'all!

Saturday, August 27, 2011

Raspberry Pie; From the Farm to My Kitchen

     
     There is an awesome berry farm where we live called Three Birds Berry Farm. They have blueberries, blackberries, and raspberries that you pick yourself. Adam and I went several times during the summer and picked blueberries and blackberries. But I hadn't been able to go and pick raspberries until this week. When I told Adam I wanted to go he put in a request for raspberry pie. I have never made raspberry pie before. I've made apple, pecan, pear, coconut, strawberry, cheese (like, cream cheese), and peanut butter pie-- but never raspberry. I happily took on the challenge because, hey. I. Have. Nothing. Else. To. Do.
     
     So! I began scouring the internet for recipes. I wanted this pie to, of course, be delicious. But there were a couple of other factors I wanted this pie to have. Number one, I wanted a filling that congealed correctly. If I spent all this time on pie that was runny my time would have been wasted. Number two, I wanted a flaky (not soggy!) crust. If there is anything I hate it is soggy bread. I won't eat a sandwich that has soggy bread, I won't eat soggy bread pudding, I won't eat my biscuit/cornbread/yeast roll that is soggy from the turnip green juice on my plate, and I won't eat a soggy pie crust. I JUST WON'T DO IT!
     
So how did I solve these problems you ask? Well...

     The pie recipe I found had an ingredient that I had never used before: tapioca. I thought, "Ah ha! that will keep the filling from being runny!" Problem number one solved. I had to think a little harder to solve problem number two. I thought back to a blackberry cobbler I had made a few weeks back. I made a traditional pie crust to cover the blackberry filling. I cooked it forever, and the crust was still doughy. That is when I decided I would make a lattice topped pie. I thought maybe since more steam is escaping that the dough wouldn't hold on to as much moisture. As far as the bottom crust staying flaky, I depended on the filling congealing correctly to solve that problem. 
     From where I sat I was confident I was about to make the best pie the world had ever seen without even breaking a sweat. Let's see how things went down, shall we?

     I started the process a day early by making the crust. Here is what you will need:

Flour, sugar, salt, cold crisco (I used butter flavored), and cold water.
Don't worry about all that saturated fat from the Crisco. I'm using organic sugar so it cancels it out.

"'I hope you don't mind; I bought you some organic food. I thought you might want to start eating healthier food.' 'Eh. That crap is for rich people who hate themselves.'" -Kate & Angie from the movie Baby Mama

For a full list of ingredients with measurements click here: Pie Crust. Unlike this recipe, however, I made my crust in the food processor and added a teaspoon of sugar.

 Pour flour into the food processor bowl.


Next, cut the cold crisco into chunks.


Add the crisco, salt, and sugar to the bowl... I realized at this point I needed a bigger food processor bowl. That was annoying. I still hadn't broken a sweat yet, though. Just wait.


I knew from watching Food Network to process the flour/crisco until the crisco resembled small peas... Uh, yeah that didn't happen for me. I just went on to the next step: adding the water.
Slowly add the cold water while the processor is on.

At the end it should look something like this.


Cut a piece of plastic wrap about 20 inches long, dust it with flour, and scoop half of the dough onto the cling wrap.


Wrap that half of dough in the plastic wrap. Repeat with the other half of dough.


Place both balls of dough in the refrigerator for at least four hours. I let mine sit overnight. 

The next afternoon I went berry picking with my sweet friend Cecelia!


Beautiful berries :)


Here is Cecelia, picking away! She made a raspberry crisp with her berries. Yum!

We had such a great time talking and laughing. Eating a few berries here and there. Picking berries at the farm was much needed time away from the house, and much needed girl time!


Look at our handy work! I chose to use the red raspberries for my pie, but if you look at the top left pint of raspberries you can see I did pick a few golden ones. They are really delicious as well. 

Back to the kitchen!
I began by rolling out the two crusts.


The first one I rolled into a "circle" that would cover my 9-inch pie plate.


The second I rolled into a "rectangle" to cut strips for my lattice top.

I used a pizza cutter to cut the lattice strips

Once they were cut, I covered both halves of pie with more plastic wrap and returned them to the refrigerator.

Now for the filling!


Don't forget to wash your berries!

Here is what you will need for the filling:


Raspberries, sugar, quick-cooking tapioca, cornstarch, and butter.
For a full list of ingredients with measurements click here: Raspberry Pie Recipe.


Place the raspberries in a large bowl.


Next add the sugar, cornstarch, and tapioca.


Stir to combine. Let this mixture sit for a few minutes while you finish prepping the pie crust.


Remove the "circle" pie crust from the refrigerator.


Remove the plastic wrap from one side of the crust, and quickly transfer the dough to the pie plate. Obviously, the plastic wrap should be on the top of the crust. Not on the bottom. If you didn't know that, I'm not sure how to help you. Using your fingers, gently press the crust down into the pie plate. If the dough cracks in places, simply pinch it together with your fingers. With that plastic wrap over the dough you don't even have to get your hands dirty! Neat-O!


Remove the plastic wrap from the crust and prepare to pour your filling into it.


My tongue is slapping my face right now! Oh man, this looks good!

At this point I thought, all is well in the world. 

But little did I know, the hardest part was yet to come.

The lattice top. Doh doh doohh.

     This is when I started sweating. I became so frustrated with the lattice top I turned off the camera and gave myself a little pep talk in the corner. "You can do this Maria. Don't let this beat you. Show it who's boss." The pieces kept breaking, and I kept having to pinch them back together. It was horrible. However, I made it through it. And after my pie was baked you couldn't even tell. The crust "melted" together beautifully. To see the correct way to make a lattice pie crust click here: Lattice Pie Crust.
To see how I butchered it, keep reading.


I thought weaving the pieces on a plastic wrap covered cutting board would make my life so much easier. It didn't. Look at that pitiful thing! Oh my word was I frustrated right about then.

However, I did do one thing right. By covering the cutting board with plastic wrap I was able to pull the crust to the edge of the board and place the very edge of the crust onto the pie. I then pulled the plastic wrap down and under the board while sliding the cutting board over the pie. The lattice crust slid right into position over the pie. Genius! 


I patched what was broken, dusted myself off and carried on. This is a lesson in perseverance children.


I smoothed the edges and cut off the excess dough. As you can see the excess dough became cinnamon sugar nuggets to bake along side the pie. I think of everything :)

Except the butter. Because I forgot to put it on top of the filling. Fortunately the lattice top had plenty of holes for me to sneak pats of butter through.

Look how I lovingly tucked that butter into bed.


Place the pie into a preheated 425 degree oven, and set your timer for 15 minutes.

I loosely covered my pie with a piece of foil for the first fifteen minutes. When the timer goes off, reduce the heat to 350 degrees and take off the foil cover. Remove the cinnamon sugar nuggets, and let the pie continue baking for another 45 minutes or so.


The butter says, "I'm melting, I'm melting!" ... sorry. I'm reading the book Wicked and the wicked witch of the west is on my mind.

About 35 minutes through the second part of the baking process, I loosely covered my pie with a piece of foil that I had cut the center out of. This will prevent excess browning around the edges.


Just FYI, I cooked my pie for an hour at 350 degrees, instead of 45 minutes. It just wasn't ready.

I was patient and waited a little longer, and out emerged the beautiful pie you see below.


Wow.


I mean come on. Seriously? I made that?

Yes ladies, and gentlemen. I did.


Cut yourself and your friends a slice and enjoy this yummy pie!


Don't forget the ice cream. My daddy is a wise man, and he always eats his dessert with ice cream. I think we have a lot to learn from him.


These are the friends I served my pie to. We had such a great time with these guys!


Who will you serve your pie too? I tell ya, whoever they are they should feel very loved. 

Love y'all!